Area K-11 Provisional Government Outskirts is a Location in Code Vein. Area K-11 Provisional Government Outskirts is as familiar as it looks as it is the battlefield where you fought the Queen during Memoires of Player.

General Information
- Previous: Crypt Spire
- Next: Provisional Government Center
- Bosses: Queen's Knight Reborn
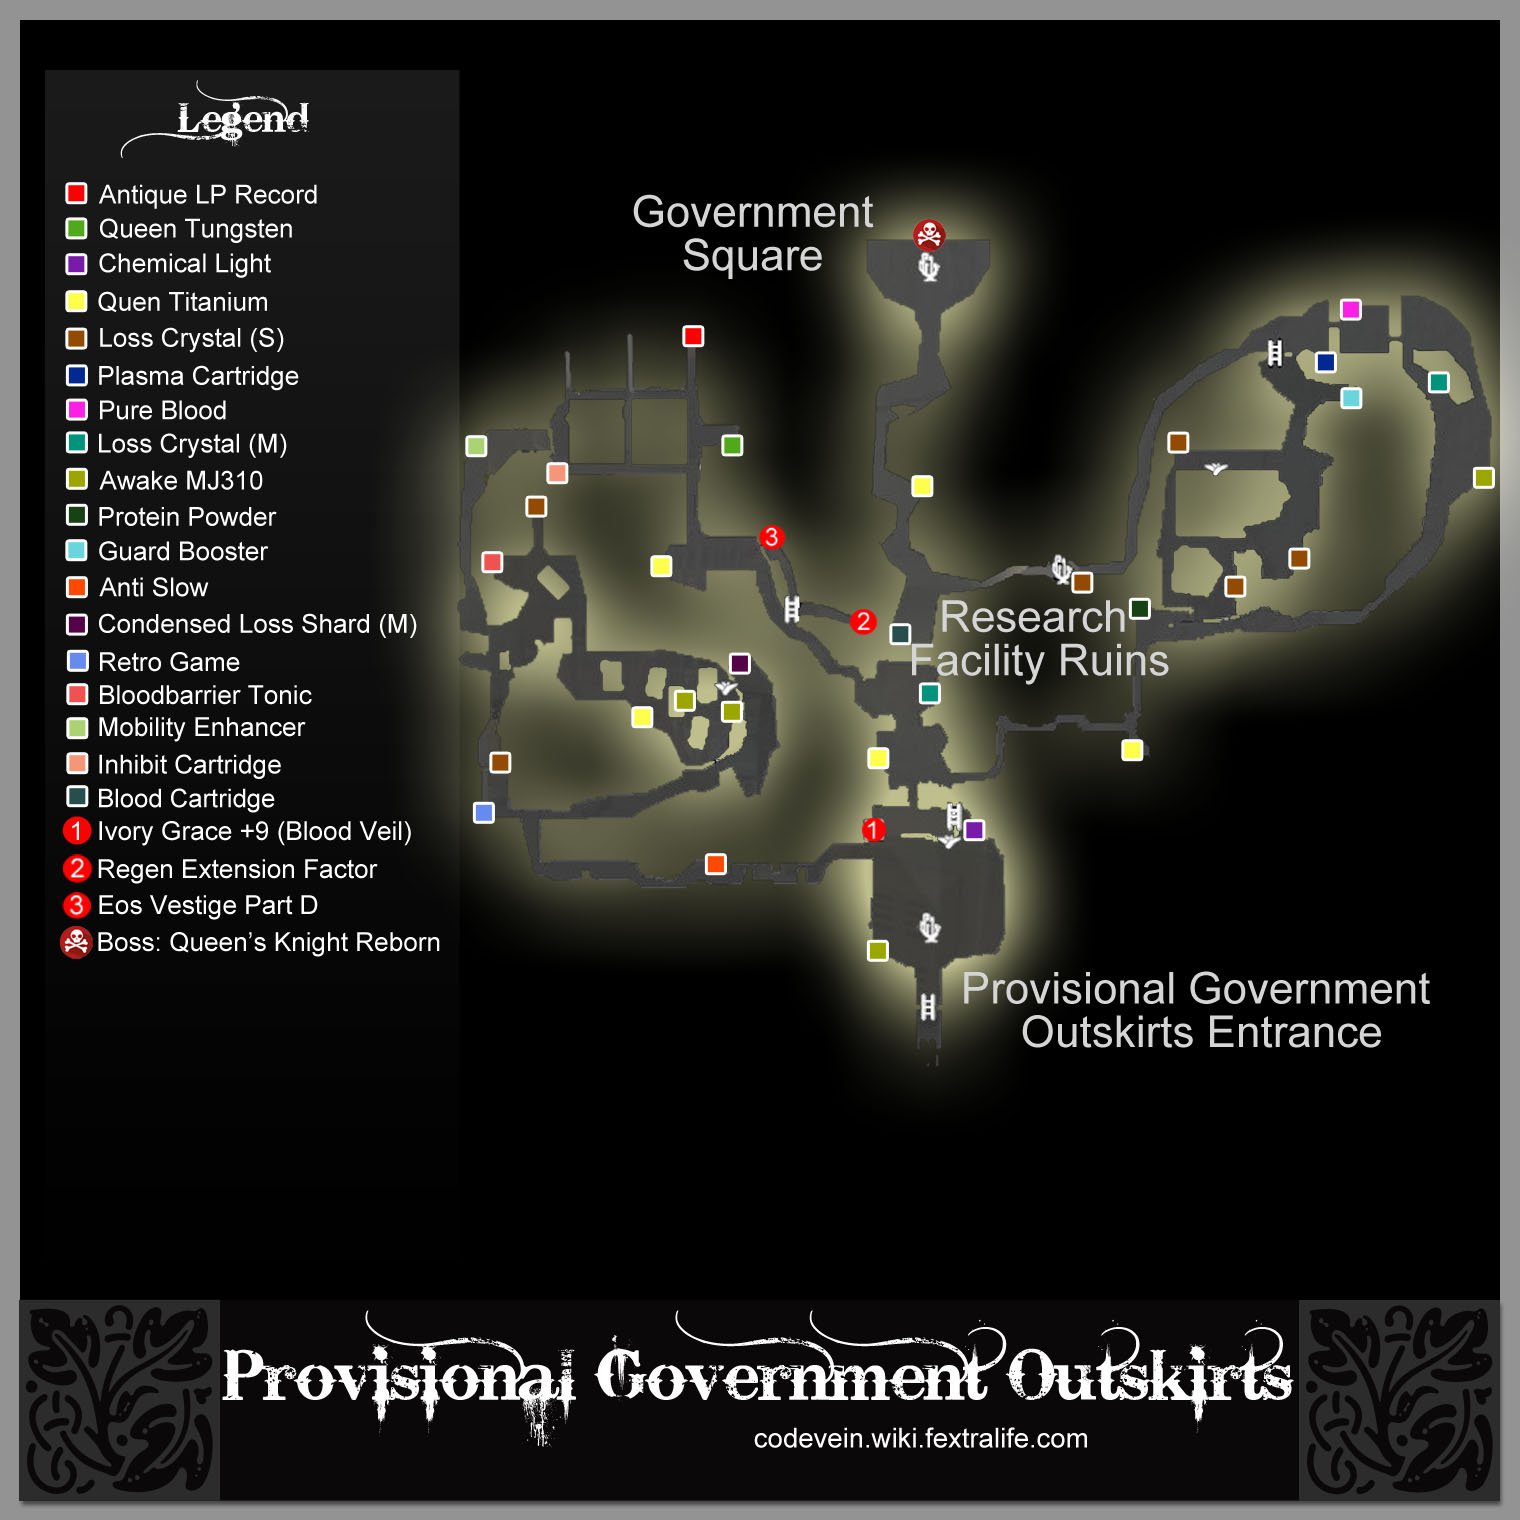
- Mistles: Provisional Government Outskirts Entrance, Research Facility Ruins, Government Square
Video Walkthrough
Map
NPCs in the area
- Example
Bosses
Items
Consumables and Trade Items
- 1x Pure Blood
- 1x Retro Game
- 3x Guard Booster
- 1x Protein Powder
- 4x Loss Crystal (S)
- 1x Loss Crystal (M)
- 2x Mobility Enhancer
- 1x Antique LP Record
- 3x Blood Barrier Tonic
- 1x Condensed Loss Shard (M)
Equipment & Upgrades
Key Items
- n/a
Vestiges
Enemies
- Lost Knight
- Lost Assassin
- Stone-Crusher
- Mutated Hound
- Axe-wielding Lost
- Female Lost Warrior
- Sword-wielding Lost
- Bayonet-wielding Lost
- Sunset Axe-Wielding Lost
- Sunset Shield-Wielding Lost
Full Area K-11 Provisional Government Outskirts Walkthrough
Upon defeating Juzo Mido , the party rushes to stop the destruction he caused which lead to the monstrous transformation of Gregorio.
Provisional Government Outskirts Entrance

The path leading to the Provisional Government Outskirts Entrance can be found through the path that you can open after fighting Juzo Mido. Simply head up the stairs until you reach the top where you'll find a ladder that leads you the entrance of the Provisional Government Outskirts. You'll find the entrance Mistle there too - before proceeding through the next section, pick up 1x Awake MJ310 near the mistle and 4x Chemical Light next to the ladder at the side.

After activating the Mistle, proceed further by taking the path to the left. You'll encounter the first enemies for this location, 1x Sunset Bayonet-Wielding Lost and 1x Sunset Axe-Wielding Lost - you'll encounter two more as you continue forward.

After killing the 2nd group of enemies, go left first and you'll encounter a Stone-Crusher. Kill it then pick up 1x Retro Game on top of the military crates - after obtaining the item, take the opposite path.

As you move forward, you'll be ambushed by 2x Lost Assassin. Kill it then fight the Female Lost Knight ahead as well.

There will be more enemies ahead after killing the female lost knight, such as 2x Mutated Hound, 2x Bayonet-wielding Lost, and 1x Lost Knight - you can pick up 1x Condensed Loss Shard (M) by the ledge, but 2x Lost Assassin will ambush you once you try to pick up the item.

After clearing the section, go back to where you got the Retro Game item then jump down the path below you. You'll encounter another Stone-Crusher and 3x Bayonet-wielding Lost - clear the section then go straight towards the Female Lost Warrior.

Before you attack the enemy ahead, there's 3x Blood Barrier Tonic that you can pick up at the left side next to the ledge. After obtaining the consumable, kill the enemy and pick up 1x Loss Crystal (S) that was behind it - next, continue further and go up the next section where you'll encounter another Female Lost Warrior.

For the next section, you'll encounter 1x Sunset Axe-Wielding Lost and 1x Sunset Shield-Wielding Lost that's blocking both paths.

Kill the enemies then loot the area for 1x Queen Titanium, 2x Awake MJ310, you'll also find a Rotten Mistle behind the broken shipping container.

Next, go back to where you fought the Stone-Crusher and Bayonet-wielding Lost and head up the narrow path as indicated on the image above, you'll encounter another Female Lost Warrior wielding an axe that's blocking your way - kill it to obtain a Queen Titanium and pick up 2x Mobility Enhancer near the military sandbags. Once you're done, head down the next path which is a supply section of the facility. There's going to be a couple of enemies here that will ambush you from almost every corner such as a Female Lost Warrior, Mutated Hound, and Sunset Axe-Wielding Lost.

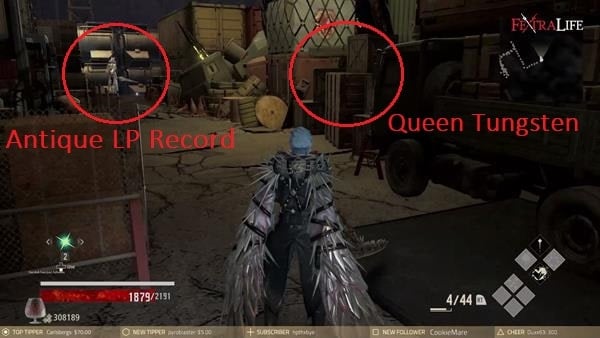
Go straight, then before heading to the path on the right, head towards the Female Lost Knight that's on your left, kill it then pick up the 1x Queen Tungsten behind the boxes and 1x Antique LP Record at the end - when you're done, continue towards the next section. There will be 2x more Mutated Hound that will ambush you as you approach the section, as well as 2x Bayonet-wielding Lost that will start to shoot at you - clear the area then pick up 1x Queen Titanium at the right-hand side of the section.

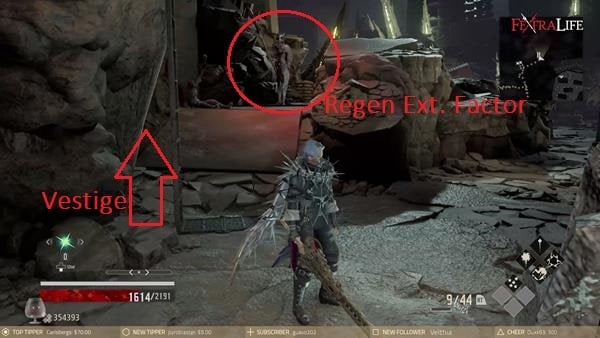
Next, follow the path then stop by the ladder. You'll see a Female Lost Warrior ahead that's guarding an item ahead. Kill it and you'll find 1x Regen Extension Factor by the glowing vines - after acquiring the upgrade item, climb up the ladder and you'll find a vestige, Eos Vestige Part D.

Head back down and continue forward where you'll encounter 2x Bayonet-wielding Lost around the corner and a Stone-Crusher ahead. Kill the enemies and loot the area for 1x Loss Crystal (M) and 1x Queen Titanium, you'll also find another Rotten Mistle near the ladder and a chest containing 1x Ivory Grace +9 - make sure to kick down the ladder to open up a shortcut that will lead you back to the Provisional Government Outskirts Entrance Mistle.

Once you're done, head to the next section which is right around the corner near the mistle as indicated on the image above. A Lost Assassin will ambush you as you go through the path and you'll encounter a Female Lost Warrior patrolling the area - there's a Queen Titanium from where the Female Lost Warrior is as well as another that is dropped by the enemy.

Next, proceed to the next section and walk up to the corpse of a Lost with a sword plunged on its body, you'll find 1x Protein Powder on top of the supply crates. After obtaining the item, take the path to your right where you'll find a lot of boxes and enemies that are waiting to ambush you.

Clear the section and you'll come across a military warehouse, there will be another Female Lost Warrior inside the warehouse and also 1x Pure Blood that you can pick up.

Head out the other side of the warehouse, then go down the ladder where you'll find a Female Lost Warrior and 2x Bayonet-wielding Lost. It's best to attack them using a projectile Gift so you can damage them from afar. After killing the first three enemies, you'll also find 2x Assassin Lost that are clinging on the ledges, you can quickly kill them by using a projectile gift attack such as Sonic Arrow - before checking the area ahead, make sure to pick up 3x Guard Booster as indicated on the image above.

As you explore the section ahead, you'll find a rotten mistle and a Lost Knight resting next to it. Kill the enemy then purify the Mistle to map the surrounding area. Also, you'll want to loot the section to find a few items such as 2x Loss Crystal (S) and another behind the glass capsule near the rotten mistle, just be cautious and look at the ledges since there's a couple of Lost Assassin waiting to ambush you - if you're done, climb back up the ladder near the warehouse.

Next, take the path ahead and you'll encounter another Lost Female Warrior patrolling the narrow path. You'll find the Research Facility Ruins Mistle here, activate it to rest and to map the surrounding area.
Queen's Knight Reborn

From the Mistle, continue forward then take the path that's on the right. You'll find another rotten mistle and the arena for a boss, Queen's Knight Reborn - once you're prepared, head inside the arena and the battle will begin.

To learn about the strategies on how to defeat this boss, you can click here. Defeating the boss rewards you with 156,100 Haze and opens up the path ahead. A short cutscene will trigger after defeating the boss and you'll be teleported into Cruz's memories. You'll also acquire the Ishtar Vestige Core which will allow you to use the Ishtar Blood Code after the cutscene with Io. Once you've regained control of your character, approach the Government Square Mistle and activate it.
The path ahead will be your next location, Provisional Government Center.
Video
Map
Trivia & Notes:
Trivia and notes go here
 Anonymous
Quite literally ran past all the enemies just to activate the ladders and get the map items. Now that that's done, will go back and get the kills.

 Anonymous
This place pisses me off. Ffs i lost millions haze here, the enemies keeps attacking me and pushing me to the damned ledge. Its not even fun, will try later when i git gud


Swept the area clean but Prize Perception says there's still 2 items uncollected.
0
+10
-1