Depths: Town of Sacrifice is a Location in Code Vein. The Depths is an abandoned and unexplored territory where vicious Lost swarms the area along with powerful entities. Players can access this area by obtaining Map: Town of Sacrifice from Dried-up Trenches, bringing it to Davis at the Home Base.
[location image header]
General Information
- Previous: Home Base
- Next: any
- Bosses: Butterfly of Delirium
Video Walkthrough
[video goes here]
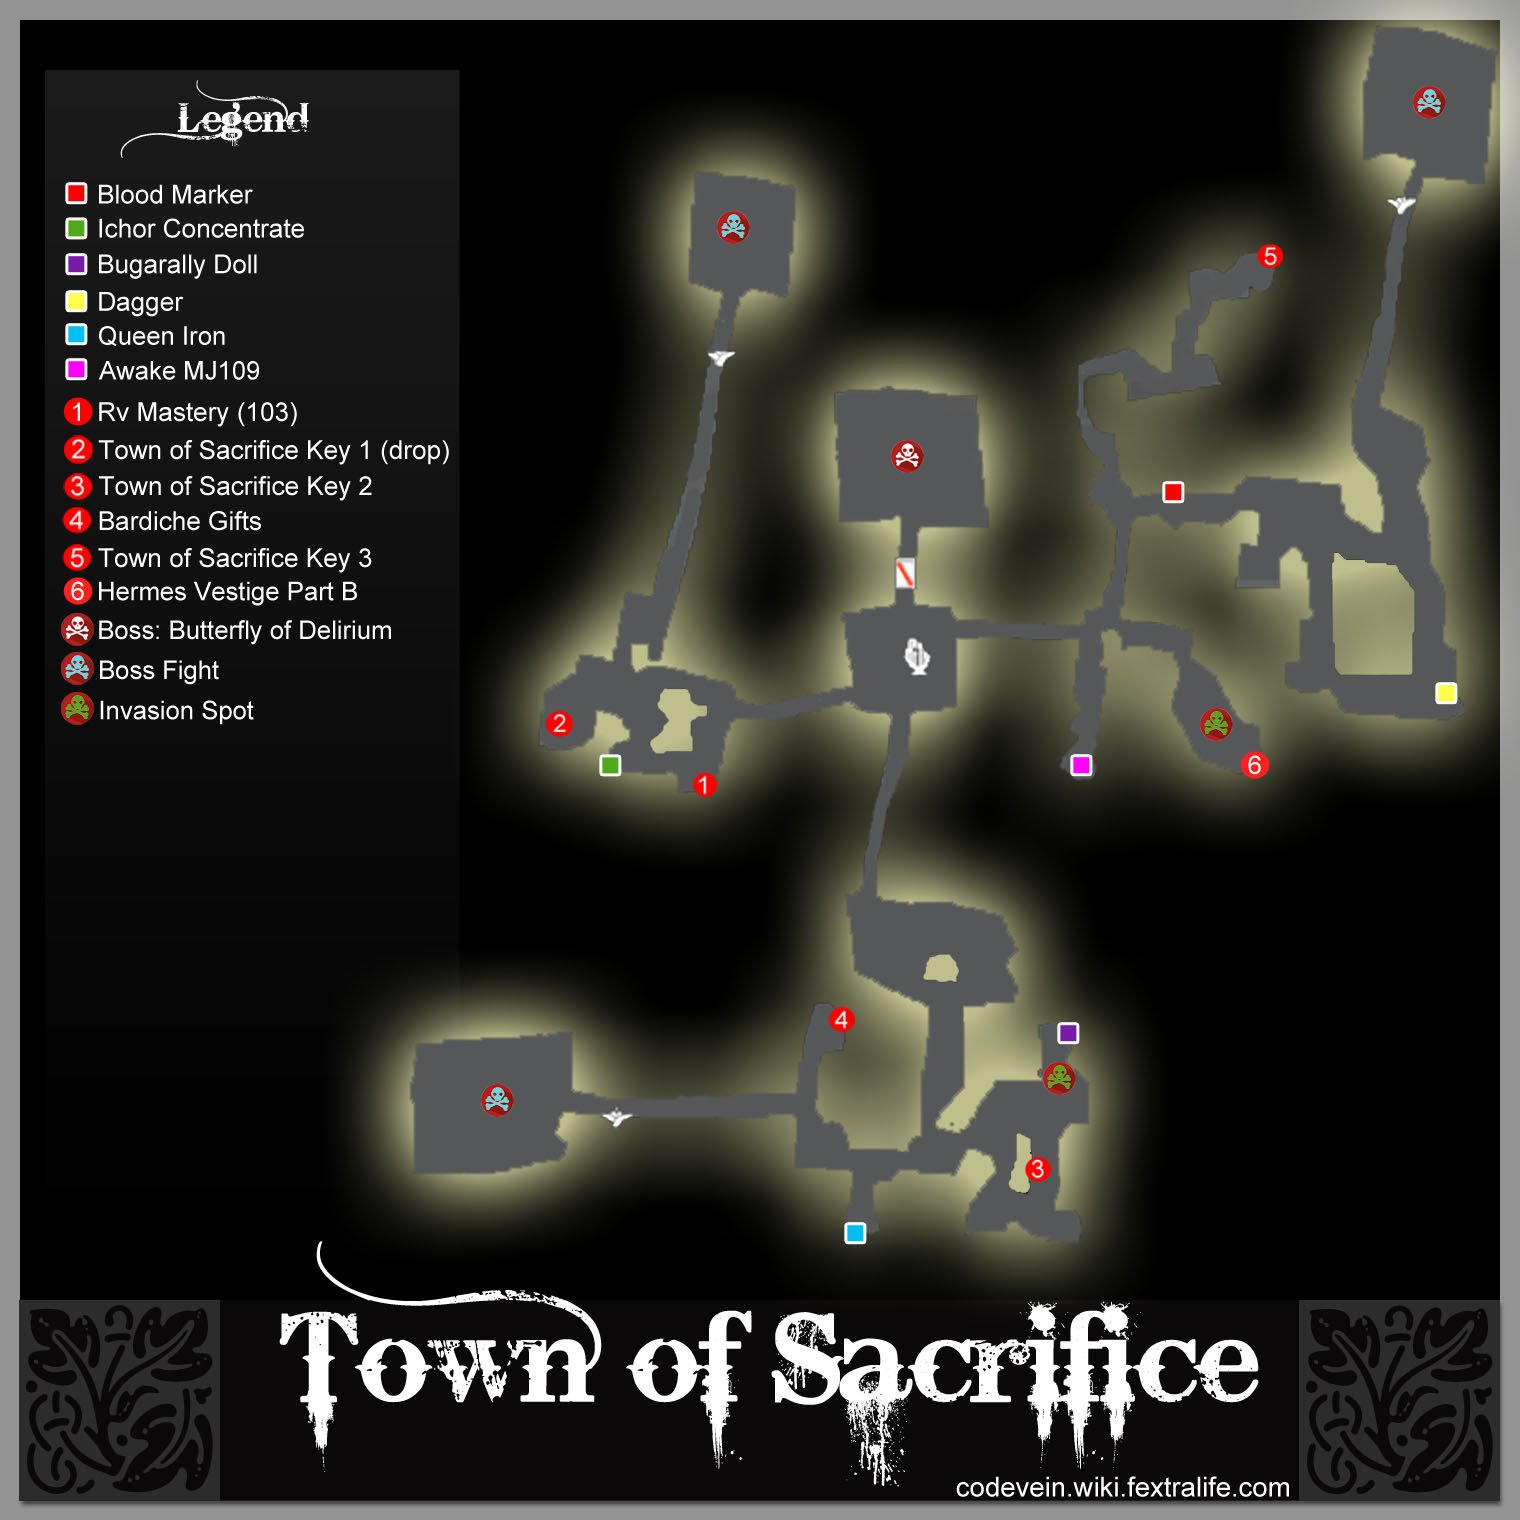
Map
NPCs in the area
- N/A
Bosses
Items
Consumables and Trade Items
Equipment & Upgrades
Key Items
Enemies
- Mutated Lost
- Mutated Hound
- Sword-wielding Lost
- Axe-wielding Lost
- Bayonet-wielding Lost
- Sunset Axe-Wielding lost
- Sunset Bayonet-Wielding Lost
- Sunset Shield-Wielding Lost
- Sword-Wielding Executioner Type Lost
- Axe-Wielding Executioner Type Lost
- Stone-Crusher Lost
- Spear-wielding Knight Lost
- Sword-wielding Knight Lost
- Monk Mutated Lost
Full Depths: Town of Sacrifice Walkthrough
The Depths is unexplored territory, the goal of this location is to seek for three keys guarded by powerful enemies lurking in the depth and unlock the sealed gate. In which holds the vicious Lost that needs to be defeated.
Talk to Davis and ask him to take you to the Depths: Town of Sacrifice.
Once you are inside the location, you will be a circular area. Behind you, there’s a sealed gate. And in front of you three paths going:
- Left: Raging Noblewoman and 2 mutated hounds/ Town of Sacrifice key 1,
- Straight:Euphoric Soldier x2/ Town of Sacrifice key 2
- Right: Euphoric Soldier x2 / Town of Sacrifice key 3

Euphoric Soldier Left Path (Town of Sacrifice key 3)
If you took the path to your left:

Map

Go straight until you find a bifurcation. From here you can go left, right or keep going straight.
If you keep straight: You’ll face against 3 Mutated Hounds, and see a vestige shining in the distance. Approaching the vestige triggers an invasion. The invasion has several waves including martial artists and hounds and a Stone-Crusher enemy at the end. Rewards a Condensed Loss Shard (S).
After the invasion, pick up Hermes Vestige Part B.
If you go right:
You’ll find 1x Sunset Shield-wielding Lost and 1x Sunset bayonet-wielding Lost. Behind them, you can find 1x Awake MJ109

If you go left:
The path will bifurcate once again. From here you can go straight or turn right.

If you go straight:
You will face against 3 drain-type lost (scorpion-like spears), and there will be 3 more afterward. After defeating them, pick up Town of Sacrifice Key 3 and backtrack so you can explore the other area.
If you turn right:
As soon as you turn, you can pick up 3x Blood Marker. You will face off against 3 enemies, and can take your next right choice to confront a Stone-Crusher and 2 Mutated Hound. Past them, defeat a Bayonet Lost and pick up 2x Dagger before continuing toward an open area with a shield-type lost and 2 bayonet enemies (this area loops around to where you came from).
Push onward to purify the rotten mistle and reveal the area map, and face the Euphoric Soldier duo of mini-bosses.
Euphoric Soldier Middle Path (Town of Sacrifice key 2)
If you take the middle path, you will come to a courtyard with patrolling Stone Crusher and 3x Sunset bayonet-Wielding Lost.

Map

Once you’ve defeated all the Lost, keep going until you find a wall and the path splits in two directions: Left and Right..

If you go left, you’ll fight 2 Sunset Halberd Lost and a Hound, and can go into a smaller area that triggers an Invasion. The invasion is waves of Monk Lost, Hounds, One-handed enemies and a Stone-Crusher at the end - it yields a Condensed Loss Shard (S) as a reward.
After the invasion, you can loot 1x Bugarally Doll from the small area and 2x dagger from the larger far area protected by 2 more Lost.
By the dagger items, look for the Town of Sacrifice Key 2 on top of a couple of barrels.
If you go right, you will face against a shield-type lost and a bayonet lost and can loot 1x Queen Iron from the ground.
Onward, defeat the 1x Sunset Shield-wielding Lost and 2x Mutated Hound and loot the nearby Treasure Chest to get 1x Bardiche (Gifts).
Now look toward the end of the nearby path, you can find a Rotten Mistle that you can purify to map the area, behind it the boss “Euphoric Soldier” is waiting.
Raging Noblewoman Right path (Town of Sacrifice key 1)
Go Right:

Map

As soon as you arrive at the courtyard with the statue, stick to your left and defeat 1x Mutated Hound. You will then be able to loot RV Mastery (103) from the ground, which grants you the gift Lightning Buff. Defeat the other hound and pick up Ichor Concentrate x1, and defeat the Stone-Crusher to obtain Town of Sacrifice Key 1.
Up the stairs, defeat 2 Lost enemies and press on the narrow corridor until you find a rotten Mistle. Purify it and the area will be mapped. Behind the Mistle, you can fight the boss “Raging Noblewoman” who is assisted by 3 mutated Hounds.
Butterfly of Delirium Final Boss
After you've collected all the Keys ( Town Of Sacrifice Key 1 Town Of Sacrifice Key 2 Town Of Sacrifice Key 3) you'll be able to open the door next to the Mistle at the level start. Behind the door, Butterfly of Delirium will be waiting for you.

After you've defeat it, you'll be rewarded with 2x Awake MJ109 and 2x Queen Iron
Video
[video goes here]
Map
Trivia & Notes:
Trivia and notes go here
 Anonymous
Still invalid information from an edition that didn’t make it to the main game. There are no Regen upgrades in this instance

You do not get queen steel from defeating the boss, you get queen iron, i just finished it - proof is here (might not be able to paste image links for some reason) ill get around to updating the walkthrough when i can, it seems this was based off NG+ on network edition.

 Anonymous
You do not get queen steel from defeating the boss, you get queen iron, i just finished it - proof is here

calm down guys... if you would like to have a better explanation just write one youself!!!!

 Anonymous
 Anonymous
This guide seems very inaccurate, you don't get any regen factors in this dungeon

 Anonymous


Cleaned up demo information from main walkthrough - updated map / images coming soon
3
+10
-1